We will begin November 1st with our Rig Up Chronicles. Check back for updates.
Day 1, November 1st.
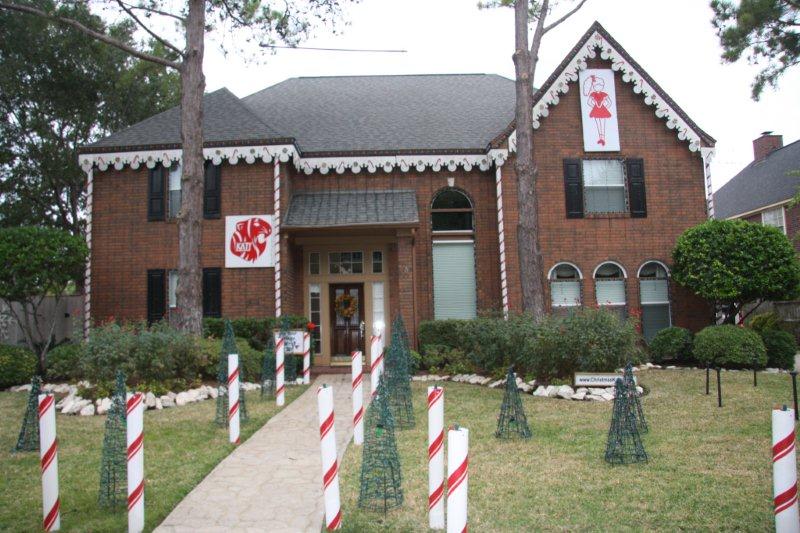
Completed installing all of the C-9 LED window frames today. There was no frame warpage over the summer which had been a concern. These were constructed from wolmanized 2 x 4’s that were ripped to 2 x 2 and bracketed together with metal L brackets. Last week we gave the frame a fresh coat of paint.
Removed the siding from the storage area built to house the 18 ft. columns and Star Panels next. Everything inside looked good, no problems with critters evident. Removed the columns and then removed the C-6 quad strings which had been mounted on the columns. These are being replaced this year with Cosmic Ribbons (CCR). One ribbon will be on each of the columns. When you purchase the Cosmic Ribbons (from LOR) you will get special mounts made of a rubber silicon material which is soft and flexible to protect the ribbon. No screws come with these so you will need to supply your own. Drilling in the small screws into the heavy 4″ PVC column was not possible with any control, so drilling a pilot hole with a small bit was in order. You do not want to slip with your drill and damage the Cosmic Ribbon. For day 1 we concluded with 2 of the four columns receiving their new Cosmic ribbons. This was a great start for day 1!
Day 2, November 2nd.
Completed mounting all the CCR (Cosmic Ribbon) lights to the columns. This took a bit longer than planned to assure no damage to the ribbon as the position of each mounting bracket had to be pre-drilled. Caution (extra time) was required to assure no damage to the ribbons from a bit slipping. Task accomplished and tomorrow the columnswill be mounted. Cold front made it’s way down which is welcome relief. Hopefully the wind will die down by the time we start working in the late afternoon.

Day 3, November 3rd
The four large Peppermint Columns with the CCR Ribbons are up. Went ahead and added 8 small peppermint lamp posts along the sidewalk and it’s looking great. Changed out the lollipops on one of the Star Banners as they weathered during the 2010 season. This year we sealed these in hopes that they will last more than one year. I will redo these after everything is up and add to the yard with the ones that get re-furbished.
Day 4, November 4th
Cut the grass one final time before starting on the front yard. Positioned the 15 mini trees on left side of yard, andthe8 mini trees on either side of sidewalk. Anchored the 8 mini trees with rebarand level positions, secured. Secured the 15 mini trees with security cable. Take off sides of storage area where gingerbread has been stored.

Day 5, November 5th.
This is the first weekend of the 2011 Rig UP, and is going to be interrupted by a football game. Got a good early start and broke out the big ladder. The peak on the right side of the house is 30 ft up and takes a large ladder to access. That ladder is heavy and not my favoritething to move around. The last three years I have used a large Cherry Picker which made this easy. This year since I was not going to do the ridge of the roof I scaled back to just a ladder. This takes alot more time and not nearly as fun. There are three things which have to occur while this process is going on. The top edge of the fascia gets a quad string of C-9 LED’s which we built in the off season. This has four strings of lights (R,G,B,WW) which are tie wrapped together and have Colonade clips on them. These clip to the Colonade Strip which wasmounted a couple of years back. Second the wire harness for the Multi-Color M5 lights is positions under the facia, and then the lightsare attached which cover the complete front of the house ground up. Third, after those two are done is adding the Gingerbread trim, which is made of wood in sections of 8 ft. or less. Carrying these up the ladder is a bit of chore and I take some extra time so I don’t fall off the ladder. Pictures of the progress follow.

Day 6, November 6th.
Continued the process across the front of the house with the lights and Gingerbread until completed. Added the Katy Tiger and Brigade Girl to finish off the front of house. Started work on the left mega tree. Assembled the two pieces of pipe, and added the Star to the top of pole, and then the bolted the four guy wires into the top of the pole before inserting into pipe which is concreted into the ground. Screwed in the ground anchors for the guy wires. Happy to report that we are on schedule.


November 7th, Day 7
Made some upgrades to the video surveillance system camera positions. Due to the placement of the gingerbread trim on the house it was necessary to re-position the cameras to get a clear view. Yes, we do have cameras going andrecord24-7. These work in total darkness as well with 72 pcs IR LED.
Day 8, November 8th
With help from next door neighbor Kong and his brother, and brother in law we brought out the two 16 ft. panels that hang from the two trees on either side of the yard and got them up. This is one of the more physical events which requires some coordination. The panels are constructed with hog wire panels that are 4 ft. wide and 16 ft. long. They are woven with Christmas Tree limbs which were recycled form older trees. Four LED Snowflakes are on each panel with some peppermint lollipops. They are heavy and awkward to lift. In order to raise these a chain is hung up in the pine tree above where we want to secure the panels with a pulley. A rope is strung through the pulley and attached to the top of the panel. The other end of rope is then pulled by two people while the panel is guided up the tree by two others. When it is high enough I have to go up the big ladder and take another chain, wrap it around the pine tree in order to hang the panel. Once the chain is positioned it is clipped to the top of the panel with carabiners. The rope gets slacked off until the chain takes the load, then the rope is removed from the panel, and the pulley and other chain are removed. Process is repeated for the two panels. Care has to be taken doing this withone person securing the ladder on the ground because the ladder is against the tree which is round, and the contact area on the ladder is straight, which means only one small area is in contact, and the ladder can easily turn on you throwing you off. I am always glad when this part is over and we get to put the ladder away.
November 9th, Day 9
Secured the base of each banner to keep the wind from swinging them around. Assembled the large mega pole and ran the cables to enable the collar to lift the lights up the pole. The overall assembly is in 5 pieces. The base below the hinge point is 5 ft. long and stabs into a concreted section below ground. The first section above ground is about 10 ft. long. Next a short section about 5 ft. is used to splice to sections of pipe together. It has a larger OD and slides over the lower section and has two bolts going thru it to secure. The next large 10 ft. section of pole stabs into the top of this sleeve and has two bolts also. Doing this enables me to store the pipe easier, andalsodueto the weight of the pipe move it around by myself. The top section of the pole is slightly smaller in OD so that it stabs into the top of the middle pole section. There is a reducer on the top of the pole to allow the large three axis star to be screwed in. Also at the top there are two pulley’s which route the cable from the winch back down to the collar.
Day 10, November 10th.
So far we have not missed a day and are on schedule for our Lights On Thanksgiving goal. Painted the mega poles and base posts with fresh coat of black enamel. Began constructing the Marty Fan and have 6 segments completed. Added two 10′ ft. 1-1/2″ x 3/16″ aluminum cross bars for additional bracing and pickup points. These were bolted thru each segment and it really stiffened up the framing. This is as big as we can make it and still move it to the front yard where it is attached to an overhead cable system. Tomorrow the last two segments will be bolted on once it is in position and the rest of the work on the fan will proceed. Today we also completed two controller remounts and pigtail changes. Some of the controllers are getting a new position this year and updates were needed to the wiring going into the controllers known as pigtails. Last project for the night was making the cuts needed on SPT2 plugs converting them from endline female receptacles to in-line. These 21 plugs will be used to connect the new peppermint poles outlining the display. A band saw is used to make the cuts.
Day 11, November 11th
Started off the afternoon adding the last two segments to each end of the fan. Added the CCR Ribbon to left half and right half. With new frame design it will be necessary to add a couple of mounting brackets in order to add the three controller boxes to the fan. This is will have to wait until Monday. Mounted three controllers to the right side of house where power outlets are. These are bolted into the brick in previously drilled pilot holes. Found the wires needed for the weekend for hooking up the upper windows and quad string along the roof edge.
Saturday, Day 12, November 12th
Neighbor Mark is going to help me this weekend on the big Mega Tree and is bringing his bucket truck. This was a long day. Sunrise to darkness with alot accomplished. First off we got the mega pole into position and raised it with the bucket truck as a lift. Once it was up the bottom bolts were added and then we added the four guy wires to secure. There is alot of weight when you add all the C-6 LED strings (288 strings 17 ft. long). The surface area of that many lights is more than you would think and the wind will really sway the lights if you do not have the pole properly secured. Next we added the Star to the top of the tree, and ran the power leads down. Each axis of the star gets separate power in order to create a spinning Star effect. The bottom ring was threaded thru the 8 T’s and secured with screws at each of the three joints. This ring is made of 3/4″ Electrical PVC. I like this pipe because the sunlight does not affect it, and it does not become brittle like regular PVC. It also comes with pre-formed couplings which to not come apart or need glue. Two small screws into each coupling holds the inner piece of pipe. Now this is where the secret part of the project starts, so you are going to get limited information on what occurred. In short the rest of the day was spent rigging the lights to the tree. I worked up top from the bucket and Mark would refill a 5 gallon pail on the ground which was on a rope to re-supply me withmore strands. Saturday ended in darkness with all the blue lights up (12 sections with 3 strands each of double long (34 ft.) C-6 lights. We were able to get 6 sections of white added before darkness fell upon us.
Sunday, Day 13, November 13th.
Continued with the white C-6 LED’s until they were completed. There was significant time spent on the secret element of this project which I will skip for now, but we learned alot and had to do some engineering on the fly. After the unveiling we will share some new lessons learned. I thought a Spiral tree was bad last year, well that was a piece of cake compared to this. The last two elements of the Mega tree are adding 12 large Mega balls, which are 8″ diameter balls with 100 count lights each on them. We have red, blue, green and white balls which have to be evenly spaced inside the 32 ft. tree. This requires alotof moving the bucket around andreaching inside the tree from the outside at all levels. You have to suspend the balls where you want them, then get power to them. This takes some time. Having one person on the ground to help guide the spacing helps. Thank you Mark for helping out all weekend. The last element are the strobe lights. These are on strings which have to be threaded inside the tree also, but now with the Mega balls in place, you have to weave in and through them as well. Starting up top we worked our way down andran power to these as well. With the lights all up in the large mega tree the last job was to go back and trim the 100’s of tie wraps that were used up and down the tree. One Mega tree up, and one to go.
Monday, November 14th, Day 14
Completed spacing out and tie wrapping the bottom section of the Mega tree. This requires all the strands to be run through a collector ring at the base of the pole. Two controllers are used on the Mega tree, so 24 channels were plugged into the strands, 4 are used in Mega Star, one channel for the strobes, and one for the Mega balls. The two remaining channels are used elsewhere in the display. All the channels were tested with a meter to verify the amp draw and recorded. One strand of lights had a capacitor go bad and will require a splice out be done to fix it before we start up the shows. Weather is calling for rain tomorrow?
Tuesday, November 15th, day 15
The rain came and we needed it. Fortunately it rained hard, and then moved on so only partial delays. Began work on mega tree #2 with guy wires and the 8 spacer rings. Lessons learned from last year on making a Spiral Tree calls for more rigid spacer rings, and position a tie wrap on each ring so that the strands can rest on. Before the rings are added to the mega tree they are getting 48 tie wraps evenly spaced around the circumference. That’s 384 tie wraps before the strands are even added. This should make adding the strands in the spiral design much faster and hopefully eliminate having to add them at each level after the light strands are added. We’ll see Thursday when we try and add the lights. The top two rings have a small circumference and therefore were made from 1/2″ flex water pipe. The third ring has rebar inside of it to firm it up and keep it from bending or collapsing. The fourth ring is made of 1/2 grey electrical PVC which is more rigid than the flex water pipe. Rings 5,6,7,8 are all made of 3/4″ grey electrical PVC which is more rigid than the 1/2″. The grey electrical pvc pipe has preformed couplings which are not subject to breaking and do not require any gluing. Two small screws are drilled into the couplings to hold the pipe in place and can be removed at the end of the season and the pipe can be pulled apart for storage. Additionally this pipe is UV resistant anddoes not become brittle like regular PVC water pipe. All the spacers are sprayed withblack Fusion paint which will adhere to plastic also. Finished the day with three spacers on the tree, and four more with tie wraps added and all are painted. Still need to add ties wraps to one more, and then get them all on the tree and redo the guy wires.
Wednesday, November 16th, Day 16
Added the tie wraps to the remaining spacer ring. Mounted three controller boxes on the frame for the Marty Fan. Re-worked some of the lights around the mounting bars for better illumination and then added the strobe lights. Wired up two control boxes to the CCR Ribbons. One power cord will take care of the 16 channel controller and the two controllers for the CCR Ribbons. These three are on the same network cable as well. Last cable needed is the power signal for the strobe lights. Hooked up andtested all with primary computer to confirm network settings and that all lights are working. This is ready to be raised up and secured for wind.
Thursday, November 17th, Day 17
Only a week to go and the pressure is on. Raised the Marty Fan up and secured for wind. Just hope it turns on next week. Mark brought the bucket truck back and we ran all 48 strands for the second mega tree, which will be a Spiral. Some improved engineering made it possible to complete this is two hours. Still need to do some work securing at bottom but the upper sections are done. Strobes are up also in the tree and the Star is working. Began running cables to the left side of display. Bolted four controller boxes into position for the 4 columns with Cosmic Ribbons. Put the last Peppermint pole into position and cut the grass one last time and removed pine needles from flower beds. This is final chance before all the cables go down. Crunch time is here.
Friday, November 18th, Day 18
Went by storage shed and picked up the conduit and pipe for tunnel over driveway. Painted some of the conduit black to use on the Spiral tree. To get a better round shape of tree we are adding 8 pieces of conduit 10 ft. long spaced around the base of tree going upwards. These 8 pieces plus the 4 guy wire cables will give us 12 points of contact. Reshaping and securing the base of tree is Saturday morning project. Added bulbs to 21 peppermint poles and started laying out wire cables.
Saturday, November 19, Day 19
Worked on re-wrapping the bottom third of the Spiral tree and made a secure tie at base. The bottom ring is 16 inches above ground which is going to make it difficult to do the run to the inside collector ring and then a run back out to the outside ring. This took over three hours but had to be done. Located the 24 cables for the tree and made all connections to the strands. The Spiral Tree is complete! Moved on the completing the wiring to the 15 smaller trees on the left side of yard, then the 4 mini trees along sidewalk. Made the connections to the four snowflakes on the vertical panel. Started the frame work for the Tunnel of Lights over the driveway. The 6 primary arches are made of three 10 ft. sections of 1″ electrical PVC which are secured with screws at the connections. No glue as we want to be able to take these apart after the season for storage. These slide over rebar put into the ground and give us good clearance for our vehicles to drive under. There are then 8 long runs of 1/2″ electrical conduit (metal) running parallel to the driveway. After these are secured to the arches the frame is quite rigid.
Sunday, November 20th, Day 20.
Started out morning by adding the globes to the tops of the Peppermint Poles. Then made a new cable for each side of yard to power them up and ran that back to controller panel. Today’s goal was complete the wiring to the right side of yard. Power lines to the windows (four colors…four cables each). Then connected the snowflakes on right panel, runs for plants, strobes, speakers, roof edge and the yard outline. This year the red/white yard perimeter lights will be strung from the Peppermint poles. This takes the place of having to add a rigid PVC frame around the yard as we have done in previous years. Three more controllers are now complete. We are on schedule for Thursday night! Rain is forecast for Tuesday, so Monday will be major day to complete the tunnel.
Monday, November 21, Day 21
Began work early in day since taking vacation days this week to complete rig up. Ran the long wire bundles of R/G/B/W lights down the tunnel from street towards house. Completed 8 runs of red and four with G/W/B. Wind is strong from south and the frame is moving with the gusts. After adding the 6 cross runs of multi-colored icycles the surface area is high enough that the top third of the framing wants to move. Added two steel cables to tether things in place. This will work for the day but more guy wires will be needed before it’s complete. Getting the lights up was not the problem, it’s wiring the power leads to the lights. Since all is visible above ground extra time has to be taken to tie-wrap the runs to the frame which is really taking alot of time. Added 6 more green and blue lights to across the top going 90 degrees to the rest and lights are good to go. The entire day was spent running these to a single 16 channel controller.
Tuesday, November 22, Day 22
Ran the network cable across top of tunnel and over to Kong’s next door for his controller. Then started running all three networks in our yard. One network is for the arch and two columns for each side of yard which are Cosmic Ribbons. That is 471 channels per network or side of yard. The third network takes care of all the other lights and two more Cosmic Ribbons up high on the arch over the Marty Fan. Ran power to 6 more Cosmic Ribbon controller boxes. Finally put out the two arches in yard and got the ribbons attached, then the strobes to each arch. Started up power to all controllers and then hooked up primary computer to run the shows to begin testing. After some shuffling of COM ports to match up to the sequences and layout finally got some lights to work. Testing proceeded for about an hour and need to make a couple of changes in the program sequencing to maximize some effects. Found a couple of channel labeled incorrectly in the program configuration and one controller that needed to have it’s Identification changed as well. Thankful that I am one day ahead of schedule and can fix things in time. Still need to add additional lights in the plants tomorrow and make some other changes but we will be ready Thanksgiving. This ends our Rig Up Chronicles for 2011. Hope you can come and see the show! We are ready!